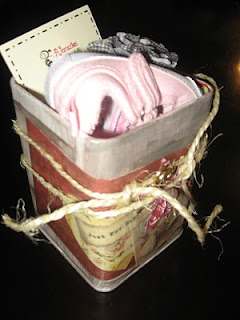
1. Start with an empty tin that you have just sitting around taking up space . . . or go to a thrift store and get one for cheap.
2. Get a color of your choice of paint to apply to the tin.
3. Let the paint partially dry, leaving it just a little damp.
4. If you would like, now add accents with a different color to the paint. If you have light paint, use a darker color for accents, and if you have a dark paint, use a lighter color as the accent color.
To get the effect I have here, I first put brown paint into the white to get a brown/tan color. I let that dry all the way, and then put streaks of the brown paint in to get the streaky dark and light colors.
5. Now, if you have paint in either your lid or your tin, use a wet paper towel to wipe it out. You want your tin to look nice both inside and out, since you will be giving it to somebody.
6. Now, if you haven't already, choose paper to go with your tin and paint colors. Cut out the desired size. I chose a piece that was a bit shorter than two of the sides in width. For this vintage look, I sand all my pieces of paper. Now you get to use mod podge! Mod podge down your piece of background paper.
7. Find all the other pieces of paper you want to put on. I have a heart, a picture of a vintagey-looking baby in a cradle with a little angel standing beside it, and a piece of paper that has a message, saying "Just For Baby!" I used the type-writer to write my message for a more vintage look. Mod podge all these pieces down where you want them to go.
8. Mod podge the whole outside of the tin, to give it the same feel - it'll look and feel better. Now would be the time to add any decorations to the cover of the tin, but I just chose to keep it plain. Modge podge the cover, also. Let the mod podge dry.
9. Add any embellishments you want. I tied a couple strands of twine around the tin, added a flower with a button in its center, and a button that looks like a scissor.
The look of the twine in the back - it was layed over each other in parts.
9. Fill your tin with goodies for the person who's going to receive it. If you have a baby tin, fill it with little pairs of shoes, hats, hair clips (I sale both of the kinds pictured below, if you're interested), or baby toys. For a birthday or holiday gift, fill it with appropriate items. This would work great for a valentines gift!
I hope you have enjoyed:)
Please email me pictures here if you make a tin! I would love to see them:)


6 comments:
That is so cute. You sure make cute stuff! I enjoyed looking at your blog. Alexa Lynn S.
Thanks, Alexa! I'm glad you enjoy my blog:)
So glad I stumbled upon your blog. :) Love the baby gift, so unique! Please consider sharing your creativity with my followers by linking up to my K.I.S.S. blog bash on Sunday. I also have a neat gathering spot for on-line specialty shops to link up to. Happy to be a new follower too.
http://thetatteredtag.blogspot.com
Thank you so much! I'm following you now, too. I think I'll probably link up my things to your blog bash - I like linking up to them:)
Amiee-
Thanks so much for linking up to my blog bash K.I.S.S., I appreciate your inspiring ideas! Hope you'll link back on Sunday. Don't forget to link your Etsy shop to The Homespun Slate @ The Tattered Tag, I feature a new shop each Friday on my blog. :) Thanks for following back.
http://thetatteredtag.blogspot.com
It's nice to find a site you can trust. I like the privacy of shopping online, but you never know what sites are okay. Visit Mymiraclebaby.com this site was recommended by a friend so I tried it. They provide a Personalized baby Gifts, Personalized Gifts, Baby Gifts at affordable price.Their service was great! I'm becoming a frequent shopper!
Post a Comment